(also Converting QuickTime to H.264)
by Brian Wilson, 9/26/06
![]()

(Read
a personal
description of Backblaze here.)
Sorry, but Nero Recode now crashes on me when I try to use it in the fashion desribed on this web page!! I leave this web page up so that maybe one day I can find a new conversion system, but DO NOT USE THESE INSTRUCTIONS!!
I wanted to document and explain how to convert from a WMV movie file that ends in ".wmv" (Windows Media Video) file to the standard cross platform and very high quality ".mp4" MP4 (also known as "H.264" also known as "MPEG-4 part 10" also known as "AVC"). Why? Because most digital cameras and many piece of PC software are now producing WMV movie format digital movies (like my Canon SD700IS, and like Windows MovieMaker), and yet due to a stupid and pointless war (so pointless, it only hurts their own customers) over formats between Microsoft and Apple that isn't a format Macintosh users can play. Due to the same inane war, if you produce a Quicktime Movie (.mov or .qt) then most PC users cannot play the movie. I don't have any crazy bias, I just want anybody that visits my website to be able to always play the movie. It turns out the correct format is ".mp4" -> EVERYBODY can play it, and for bonus points it is a very very high quality and very very low bandwidth solution, backed by all standards committees and both Apple and Microsoft support it in their default media players right out of the box! What is amazing is how many *OTHER* silly formats are out there when the choice is now clear. It is also amazing how hard it is to find these instructions anywhere on the web.
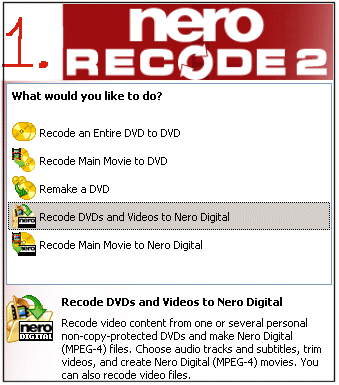
Step #2: Choose "Recode DVDs and Videos to Nero Digital" from screen 1 in "Nero Recode 2". See below for a shrunken composite of the screen. See how retarded Nero UI designers are? To make you choose the menu below when really all you want is to "Convert from WMV to MP4"? Seriously, every time somebody on earth pauses on this screen and is mystified, the programmers at Nero deserve an electric shock. Every time it happens the shock should get stronger until the programmers start screaming in pain, then finally are killed if they choose to not fix the software and it continues shocking them. They might actually consider CARING about their software and making it EASY TO USE instead of producing this embarrassing UI nightmare below. Oh, let me explain -> the word "Videos" means "WMV", and (this next part makes me cringe in pain) the words "Nero Digital" are LIES!!! "Nero Digital" means "H.264" -> they just decided to rename it something nobody has ever heard of, and they (retarded shaved apes) think that people want something PROPRIETARY FROM NERO instead of a world-class and world-trusted standard of MP4/H.261. Stop and consider how stupid they have to be to believe this? Shocks-> the engineers need a shock treatment every time somebody pauses on this screen until they fix it to say "Convert WMV to MP4/H.264".
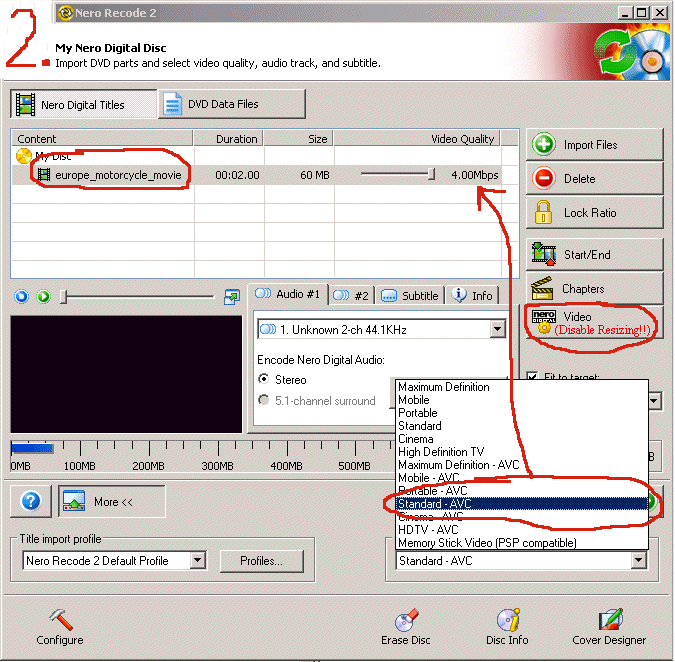
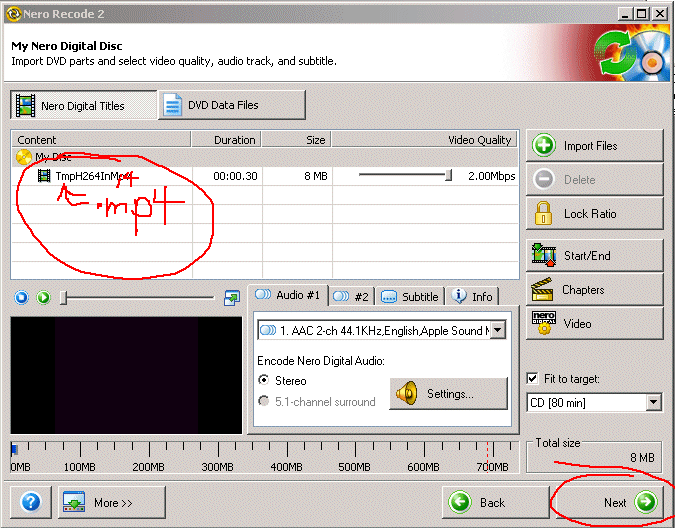
Step #3: Import your WMV file in screen 2 in "Nero Recode 2". In the screen below, you can drag and drop your WMV file (in the example below it is called "europe_motorcycle_movie.wmv") onto the "Nero Recode 2" window. Then configure a few things -> like choose "Standard AVC" which will change the "4.00 Mbps" to "2.00 Mbps". Also, click the "Video" button on the right and "Disable" all of "Resizing", "Cropping", and "Interlacing" -> you don't want any of that.
Step #4: Hit "Next" in screen 2 in "Nero Recode 2" taking you to "screen 3". Choose a location for the file, and hit "Burn". Done! Click europe_motorcycle_movie.mp4 to see the results.
Ok, so Apple QuickTime on Windows attempts to prevent you from having a decent, portable format known as H.264 or Quicktime. Here are the step-by-step instructions for producing a portable cross platform ".mp4" with H.264 encoding from an Apple QuickTime ".mov" file on Microsoft Windows XP or Microsoft Vista.
Step #1: Install QuickTime 7.1.3 Free Version (this comes automatically and free with iTunes, so you might already have it).
Step #2: Buy "QuickTime Pro" for $30 from http://www.apple.com which will send you a license key. Type that license key into your free version of QuickTime and now you have the ability to export movies out of the Apple QuickTime Player.
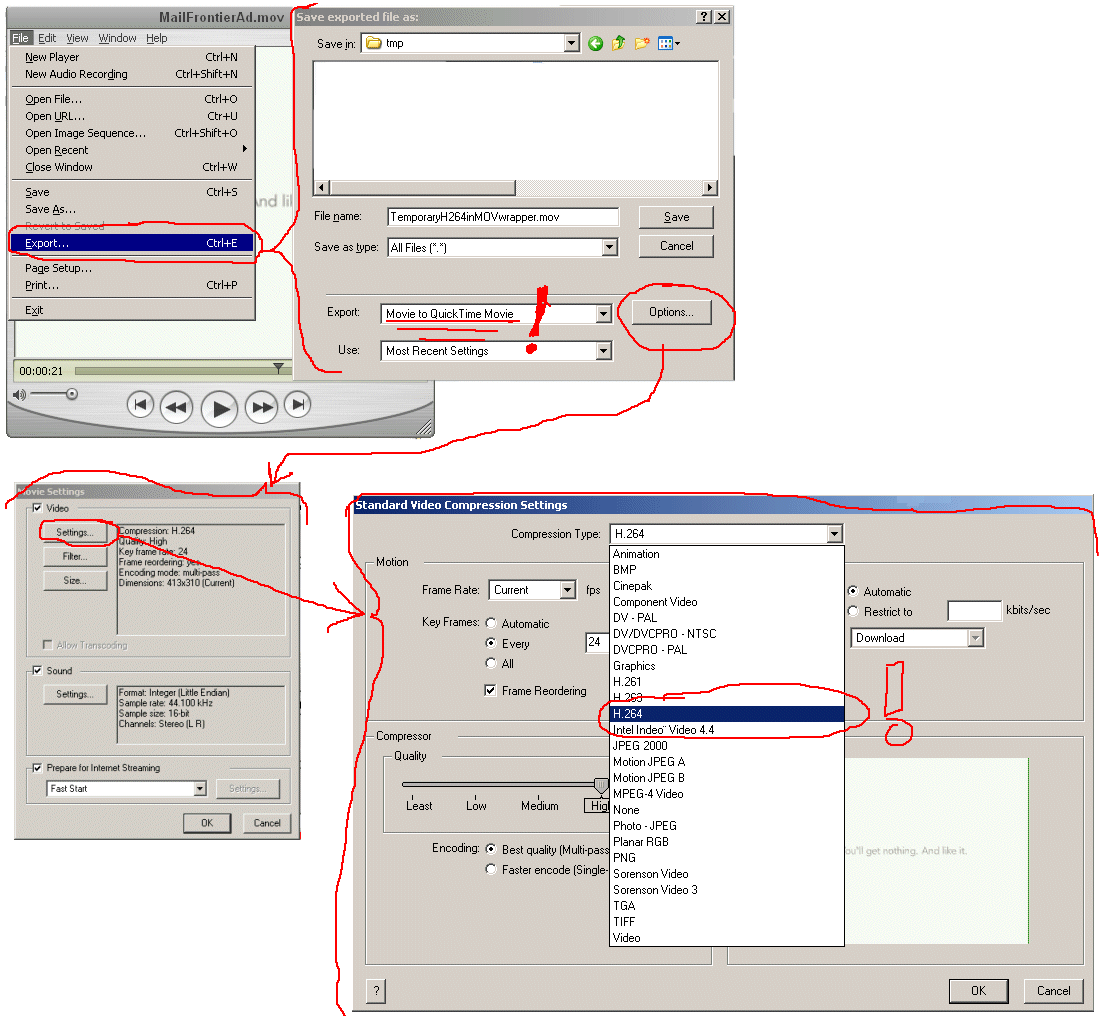
Step #3: Export as ".mov" with H.264 encoding!! Here is how -> Load your Apple ".mov" QuickTime file into the Apple QuickTimePlayer, make sure it can be played. Then choose "File"->"Export..." and then Choose "Movie to QuickTime Movie", click "Options", then choose "Settings" in the Popup, then and select "H.264". Look at the screen shot below for visuals on how each of the QuickTime H.264 dialogs pops up and what to choose. IMPORTANT NOTE: "SaveAs" grays out the "H.264" menu item to fight with you, you must use "Export" to get this functionality.
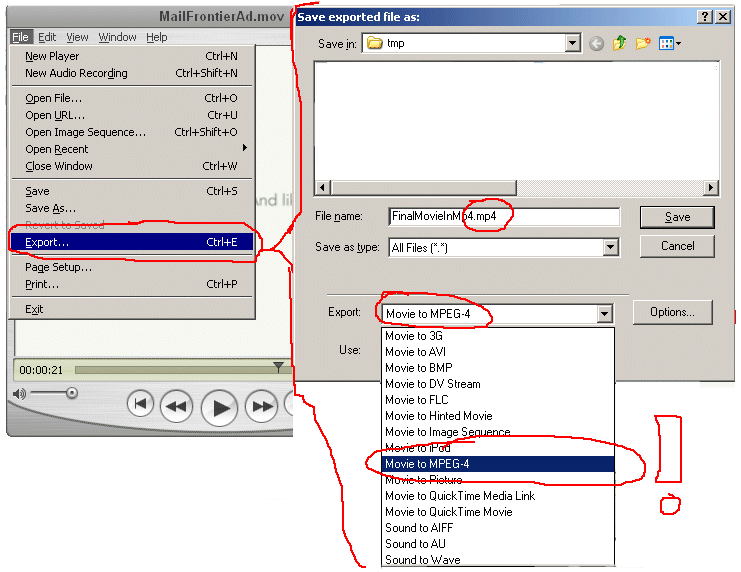
Step #4: Open the NEW TEMPORARY movie in Apple QuickTime player, and Export ***AGAIN*** now choosing "MPEG-4" as the format. Below is a screen shot showing that.
Step #5: (THIS STEP NO LONGER WORKS!! SEE ABOVE "NEW INFORMATION") Use Nero to recode this ".mp4" file into another ".mp4" file!! The problem is that the Apple has introduced non-standard codecs most computers don't have. Use the procedure at the very top of this document as the way to recode, below is a hint of a screenshot.
To see the final result, click here to play one of these MP4 H.264 movies.
(Read
a personal
description of Backblaze here.)
![]()